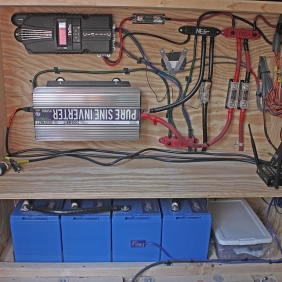
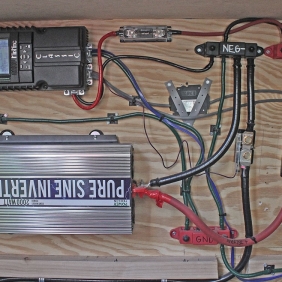
I want to begin by saying that the sexiest part of Vanderella for me, is the off grid solar system. It makes my nomadic life possible. Even as I now type this, I can only do so because I have power for my laptop, monitor, lights, and vent fan due to the solar power.
There is quite a bit of info out on the web regarding off grid solar systems, and it can be a bit confusing. Even as an electrical engineer, I spent roughly three months researching various equipment, schematics, and installations before I felt confident enough to know which equipment to buy and how to connect it. I’m going to explain it as best as I can. There are multiple components that make up the system. I remember having a lot of unanswered questions when I was doing my research, so I will try to fill in those gaps. It gets technical really quick. There is a lot to cover so let’s jump right in.
Solar Panels
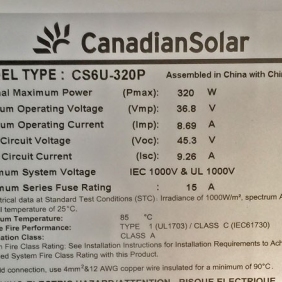
I have four 320 watt Canadian Solar panels on the roof for a total of 1280 watts. These panels collect the energy from the sun. They are polycrystalline panels. I chose the panels based upon the wattage and physical dimensions so that they would mount easily on the roof. Monocrystalline panels would have been smaller, but would have created a mounting problem at an awkward spot on the roof, so I chose a larger panel that is approximately 78″x38″. I see people putting multiple small 100w panels on their vehicles and I personally don’t agree with this. Every additional panel requires more fasteners that will penetrate the roof and become more chance for leaks. The argument is that the physically larger panels are more fragile than smaller panels. I have not experienced this at all. I would also note that there are many people in the vanlife world that are successfully using larger panels. I recommend using panels that maximize the roof width of your vehicle without going over. Let the roof dimensions dictate the panel size. Also a bunch of small panels in parallel make for a ton of connections, and a wiring nightmare.
I chose to mount them flat on the roof because I wanted them to be mostly hidden and I had zero interest in tilting them to get slightly more efficiency. Tilting them would require some sort of mechanism and also a ladder for me to get up to them and move them. Not interested. With flat mounted solar panels, you can expect roughly 50% efficiency of the rated panel wattage. So, with 1280 watts of panels on the roof, I should expect to see about 640 watts or so of input power. In my experience, The most I have seen is 700ish or so. I often see 400-500 watts of input power on my charge controller. Before you get too concerned about this, realize that the charge controller is constantly adjusting the amount of power absorbed based upon overall system conditions. You would only see super high wattage input conditions if you had a large battery deficit and the system is trying to pull in maximum power. The system I have rarely dips down low enough to require such high wattage charging. More on that later.
The solar panels take up quite a bit of the square footage of the roof. Not only do they collect the solar energy, but it seems like they help keep the roof of the van cool. As they absorb the sun’s energy, they cast a shadow on the roof itself. There is a 3″ish air gap between the panels and the van roof. That air gap seems to work to prevent super heating of the van roof.
The four panels are connected in a series parallel combination. This means that two of the panels are connected negative to positive which add their output voltages together. Then, those two series pairs of panels are connected positive to positive and negative to negative and combined in parallel to feed the solar charge controller. The rated operating voltages for each panel is roughly 36VDC, so two panels in series would be roughly 72VDC. In real world operation, the Midnite Solar Classic 150SL charge controller is constantly adjusting the voltage and current based upon it’s algorithm to optimize the charging conditions. During daylight hours, actual voltage is usually around 78VDC and does go up as high as 80VDC. In lower light conditions it will go way down near zero. It never goes to zero though. Even as I type this now at night, there is 6.2VDC coming in. If you park under a street light or parking lot light, you can end up with roughly 20VDC coming in. This nighttime light can be a pain. It is enough light to trick the Midnite Solar Classic 150SL into thinking that there might be enough light to start another charging cycle. This results in a bunch of audible clicking at night that can keep you awake and drive you crazy. I recommend not parking under street lights if you can avoid it. If you can’t avoid it, I recommend turning off the breaker between the solar panels and the Midnite Solar Classic 150SL at night. That way it doesn’t see any voltage and therefore doesn’t try to charge. Just rememember to turn it back on in the morning.
Solar Charge Controller
For this I chose a Midnite Classic 150SL. There are plenty of other companies that make charge controllers such as Outback, but in the end I chose this one because it seems like many people are using it with flawless performance. The charge controller takes the inputs from the solar panels and adjusts the voltage and current in real time to optimize charging. It then outputs the power as a regulated DC voltage that you specify (in my case 12VDC).
The Midnite Classic 150SL simply just works. It will occasionally beep a warning beep (like once every couple months), but by the time I can get to it, it has stopped and doesn’t show any irregular status. I’m still not sure what is causing that alarm, but it doesn’t seem to be anything permanent or problematic.
The charge controller is the most sophisticated and difficult piece in the whole system. It needs to be configured correctly for proper operation. In the process of putting my system together, I contacted Midnite Solar via phone three times to get info and clarification on system design and details. The technical support at Midnite Solar was great. They were extremely helpful and were willing to explain the specifics that I was unable to find elsewhere online.
The solar charging cycle has four stages; Bulk, Absorb, Float, Rest. Each stage decreases in the amount of power absorbed by the battery. Bulk is the highest. Rest is zero. In the morning when there is enough sunlight to start charging, the charge controller kicks in the bulk stage. It will stay there until it reaches a certain battery percentage, and then switch to absorb or float, eventually ending on rest. Usually, only a couple hours or so per day are spent in bulk. A good portion of the day is spent in absorb or float. During absorb or float, it uses the incoming power for both trickle charging the battery as well as any load that you are currently using. This of course depends on how depleted the battery is. If it is far enough down, it could be in bulk for hours.
The cooling fans on the Midnite Classic 150SL turn on fairly often. They seem to only run for 5-10 minutes at a time. They are most likely to turn on during the bulk charging phase when a bunch of power is being absorbed. They might run a total of 30 minutes per day. Some days they never even turn on at all. They aren’t super loud, but are definitely audible.
Battery
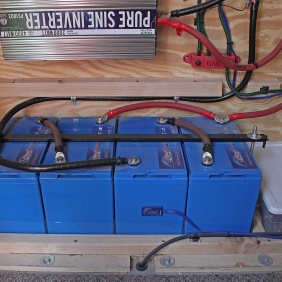
I’m using Fullriver DC-220-6 AGM deep cycle batteries. They are 6VDC per cell and are rated for 220AH. The batteries are connected in a series parallel combination similar to the solar panels. There are two batteries in series, with two pairs in parallel for a total of 4 batteries altogether. Even though there are multiple cells, the combination of all of the cells together is still considered a single battery. The total current of the battery is 440AH. The overall system voltage is 12VDC. This system voltage is common in cars and is useful as there are a ton of accessories that are designed around the 12VDC standard. The AGM batteries are sealed and do not require any maintenance like a typical lead acid would. If you have the money and would like to upgrade, I’d recommend going with a lithium battery such as a Battle Born. The cost is much higher, but there is less weight, significantly more duty cycles, and a deeper depth of discharge.
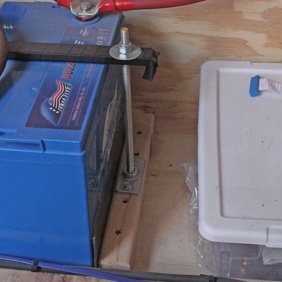
The battery is secured to to the plywood box using threaded rod. The 1/4-20 threaded rod is threaded into a mounting bracket using Loctite red to make sure it doesn’t back out. There is a 3/4″ piece of steel u-channel that runs along the top of the battery and is held in place with nuts and washers to prevent the battery from bouncing. The u-channel is wrapped in Scotch 33 electrical tape to prevent any accidental conduction to the battery terminals. There are wood blocks screwed in place on either end of the battery to prevent it from sliding around.
Inverter
I’m actually using a generic cheap true sine inverter off of Amazon. I don’t use a lot of high wattage loads, so I didn’t feel as though a higher end inverter was required. After some research, it appeared as though the cheaper unit was sufficient and would serve my purposes. So far, that has proven to be true. I might at some point upgrade, but changing out the inverter is a relatively simple task. Even though the inverter is rated for 2000 watts, the actual load limit is somewhere around 1000 watts. I have attempted loads in the 1200 watt range and the inverter alarms and won’t sustain the load. This has not been too much of a problem for me as I don’t really use too many high demand loads. If I was starting all over again, I would definitely buy a 3000 watt inverter instead of the 2000 watt. The only tools that I can’t run with this inverter are my shop vac and 7-1/4 circular saw. A grinder works fine. Dremel. 700 watt microwave. Soldering gun. I would also note that the cooling fans on this inverter rarely turn on. They might turn on if it is 85 degrees outside and I’m using 400-500 watts for a sustained period of time.
12 Volt Equipment
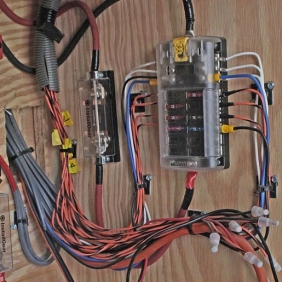
I have a terminal block that feeds my 12VDC circuits. Those circuits are LED lights, 12VDC outlets, roof vent fan, MOFI cellular wifi. Those circuits are protected with automotive fuses in the terminal block. You want to use 12VDC to power any devices if you can. An inverter actually wastes a little bit of power just by being on. If you can find a 12VDC power source for a device, you might not need the inverter on all the time. I only have my inverter on if I’m using my computer or need it for a power tool.
A 12VDC outlet is the standard old school automotive cigarette lighter style outlet. Here is my favorite. There are lots of accessories that run on 12VDC. Anytime you are buying a new device, check to see if there might be a 12VDC version or option available. The most obvious one is a usb phone / ipad charger.
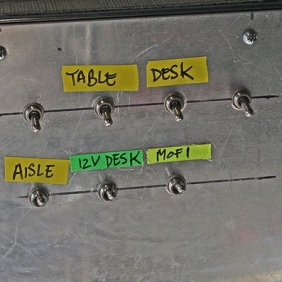
I made a custom switch panel for my 12VDC equipment that is mounted to a rack at a convenient height. The lights and 12VDC outlet are on switches, but so is my MOFI router if I want to easily turn it off. My vent fan is not on a switch, but it wouldn’t be a bad idea as it trips out every once in a while and now I have to pull the fuse to reset it, instead of just flipping a switch. There are a couple spare switches for future use as well.
But How Well Does It Work?
Ok great, but what does all of that technical talk mean in the real world? Let’s talk watts because that seems to be the most useful and relatable unit. Because I have an AGM battery, I can safely use 50% of my battery capacity without doing any damage to it. At 100 percent battery charge of 440Ah, I have 220Ah available or 2640 watt hours. If a typical laptop charger pulls 90 watts, I can use that laptop for 29 hours straight before the battery gets down to 50%. Led lights are very efficient and only draw 5-8 watts per light. My 27″ computer monitor only draws 32 watts. Lets say that with my laptop, monitor, lights and vent fan all running, I am drawing about 250 watts. At 2,650 available watts, I can run that setup for 10.6 hours straight. That’s not even including that I might be running these loads during daytime hours when the sun is out and I might be using extra power that can’t be stored.
In general, my battery is still usually between 85-90% at the end of the day from my usage. I currently use somewhere in the neighborhood of 700-800 watts per day. I don’t have AC. I don’t have a refrigerator. My load is mostly computers, lighting, and vent fan. When I built my system, I couldn’t find any solid references to give me a ballpark idea of what kind of performance I would get. Because of this, I designed it conservatively. In reality, I could have cut the system size in half and still met my electrical needs. With 700 watts used daily, I can run my electronics for almost 4 days straight without sunlight before I get down to 50%.
Here is another thing. The system still takes in power even on cloudy and rainy days. It might only take in 500 watts or so all day, but it still takes in power. That means that even on a cloudy day I’m still not using pure battery. I have only ever had my battery down near the 50% mark one time and that was due to 5 straight days of cloudy days in Cincinatti. The most power I have collected in a single day is 2900 watts, and that was the next sunny day after all of the cloudy days in a row.
I’m actually leaving a bunch of watts on the table. Meaning that my solar system is capable of producing more watts than I am currently using. I could easily add a Dometic cooler and not overload my system. The magical part is that there is no additional cost to me for using this extra power, as the sun comes up again tomorrow and recharges the system for free. That is the part I still can’t get over. The sun just comes around again tomorrow and charges that battery right back up. Magic.
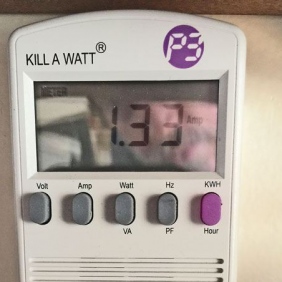
I recommend measuring the true watts consumed of the equipment that you plan to use on your solar system. You can do this with a Kill A Watt meter. Plug your device into the Kill A Watt meter and then plug the meter into a wall outlet. The meter will tell you how many watts your device is using. You want to measure this over a little bit of time just to make sure that the watts used doesn’t change. The wattage consumed for a device is usually printed somewhere on the device, but I find it helpful to use this method to measure a combination of devices together, or to compare actual watts to rated watts.
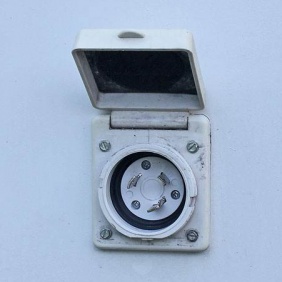
I have also installed a shore power connector on the side of the van so that I am able to connect to shore power should I choose to. I installed this before I knew exactly how well the system would perform, and I almost never use it. Occasionally I will connect it so that I can clean with a vacuum that won’t run off of my solar setup.
On a side note, my off grid solar system is completely separate from my vehicle chassis electrical. In fact, the off grid solar is only connected to the vehicle chassis by a ground on the frame.
I have seen people online trying to install battery isolators and automatic charging relays. I do not use either. In all of my research, it seems as though those devices are more trouble than they are worth. They seem to end up causing weird electrical anomalies in the chassis electrical, and I’m just not interested in dealing with any of that. Besides, I have more than enough power from straight solar that it is pointless to me.


